") |
The M114A1 155mm Howitzer Crew Description of Components a. 2x Standing figures bending over. b. 2x Standing figures with hands on hips. c. 2x Loader figures holding shell. d. 2x Standing figures covering ears. e. 2x Standing figures with arm raised. |
| Assembling The M114A1 155mm Howitzer Crew Simply arrange one of each figure type around each of the M114A1 155mm howitzer to taste. The M114A1 155mm howitzer and crew a modelled on the large six-hole bases provided in the box set. |
") |
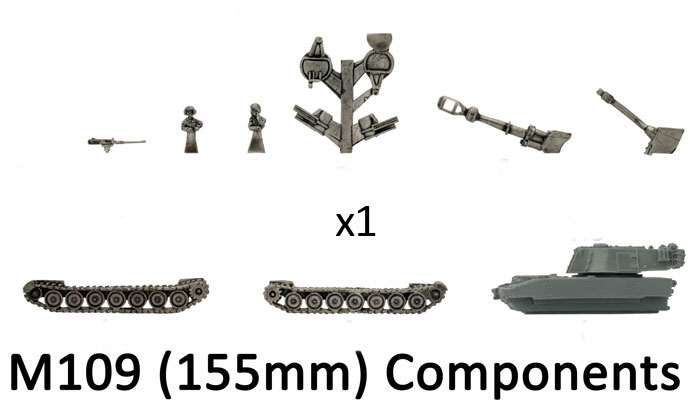
| Description of Components |
| a. 4x Gun trail wheels. b. 2x Gun shields / carriages. c. 2x Gun carriage stabilisers. |
d. 2x Gun barrels. e. 2x Gun trail legs. f. 2x Gun trail spades. |
") |
The Bases Description of Components 3x Large six-hole bases. |
| Assembling The M114A1 155mm Howitzer |
| Step 1. Begin assembly of the M114A1 155mm howitzer by attaching the spades to the end of the gun trail legs. | Below: Both spades attached to the gun trail legs. | Step 2. Next, attach the gun carriage wheels to the sides of the gun shield / carriage. | |
") |
") |
") |
") |
| Below: Both gun carriage wheels successfully attached to the gun shield / carriage. | Step 3. Next, its time to attach the gun trail legs. The back of the gun shield has been keyed to accept the gun trail legs. | Below: Attaching the gun trail leg to the back of the gun shield. |
") |
") |
") |
| Below: Both gun trail legs successfully attached to the back of the gun shield. | Step 4. Next, attach the gun carriage stabiliser to the underside of the gun shield. | |
") |
") |
") |
| Below: The attached gun carriage stabiliser on the underside of the gun shield. | Step 5. Finally, attach the gun barrel to the gun carriage. | |
") |
") |
") |
| Below: The gun barrel attaches to the gun carriage just behind the recuperator cylinder. | Below: With the gun barrel in place the M114A1 155mm howitzer is ready to be painted. | |
") |
") |
") |

")
")
")
")
")
")
")
")
")
 (VUSBX08)")
 (VUSBX08)")
 (VUSBX08)")
 (VUSBX08)")
 (VUSBX08)")
 (VUSBX08)")
 (VUSBX08)")
 (VUSBX08)")
 (VUSBX08)")
 (VUSBX08)")
 (VUSBX08)")
 (VUSBX08)")
 (VUSBX08)")
 (VUSBX08)")
 (VUSBX08)")
 (VUSBX08)")
 (VUSBX08)")
 (VUSBX08)")
 (VUSBX08)")
 (VUSBX08)")
 (VUSBX08)")
 (VUSBX08)")
 (VUSBX08)")
 (VUSBX08)")
 (VUSBX08)")
 (VUSBX08)")
 (VUSBX08)")
 (VUSBX08)")
")
")
")
")
")
")
")
")
")
")