Posted on

M109 (155mm) Spotlight (VUS150)


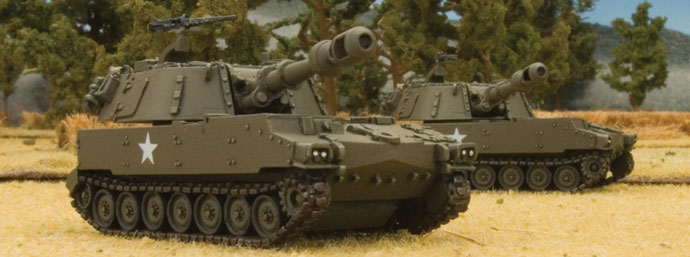
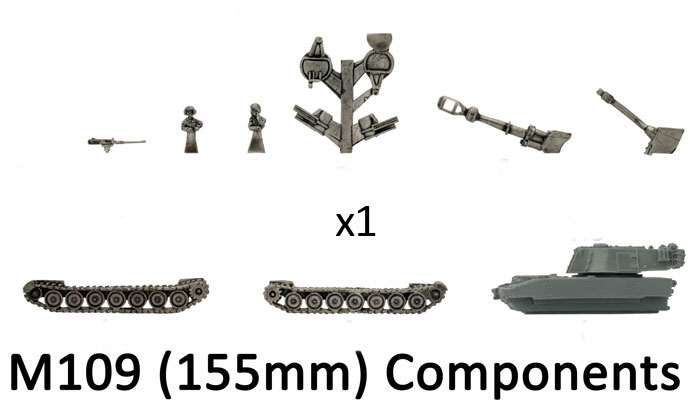
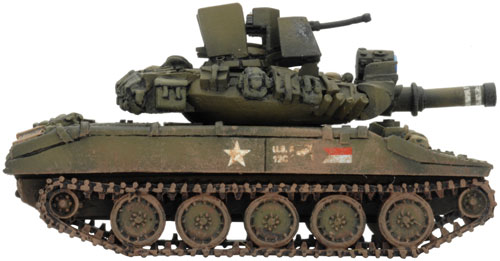
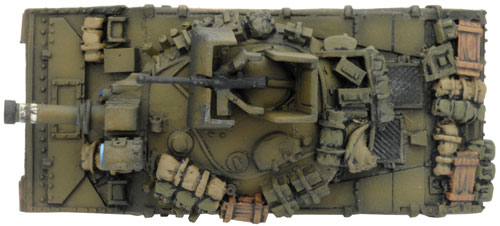
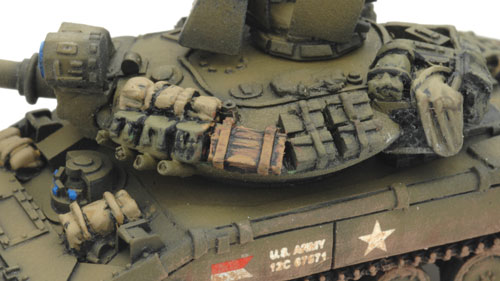
Includes one M109 (155mm) Self-propelled gun with M108 (105mm) option, four Vehicle commander figures

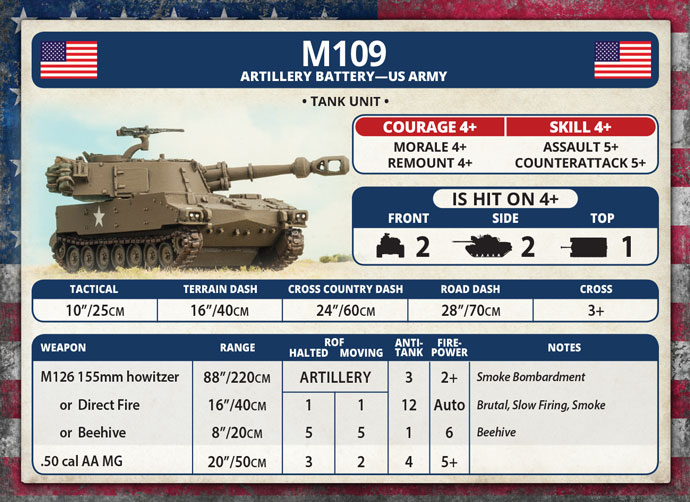
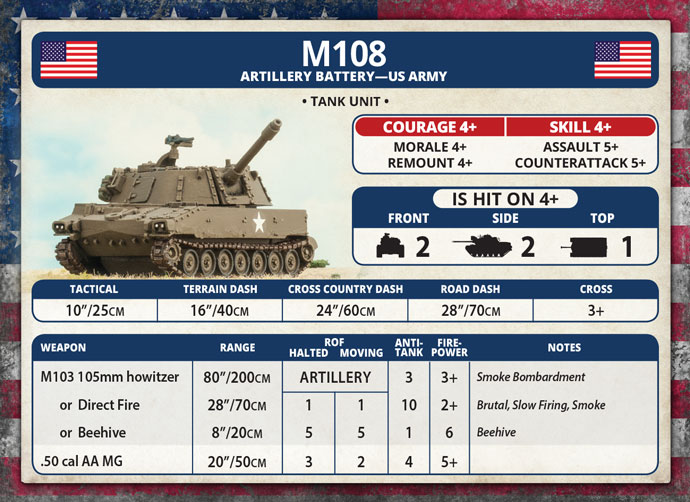
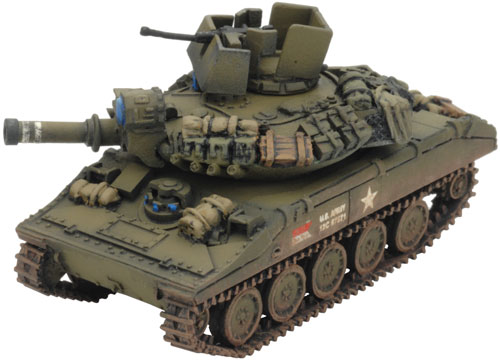
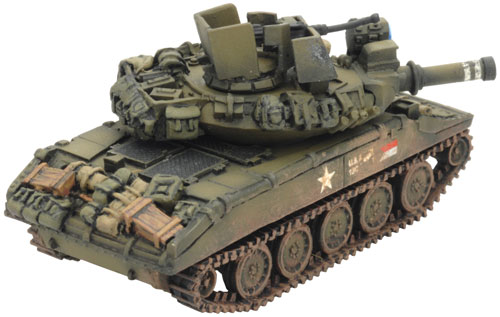
The M108 (105mm) and M109 (155mm) are the latest self-propelled artillery pieces in the US Army. Initially, the lighter M108 was preferred for its ability to carry more ammunition and the relative ease of resupply. Later they were phased out in favour of the more effective M109, as the supply problems were reduced when operating from fire support bases.

Check out the M109 (155mm) in the online store here…

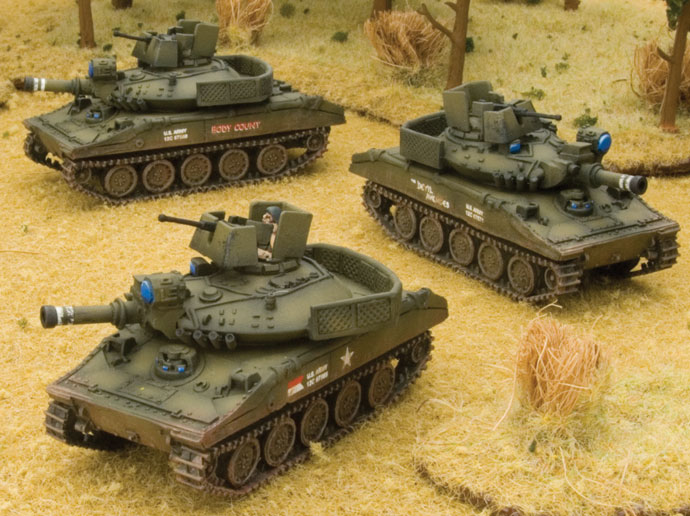
Deployed in static firebases they provided long-range fire support for troops put in the field as well as much-needed defensive firepower when PAVN troops came out of the jungle.

Designed by Tim Adcock
Painted by Andrew Agutters

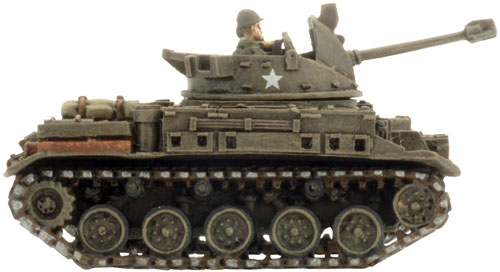
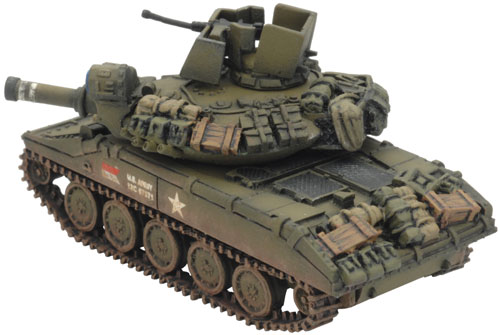
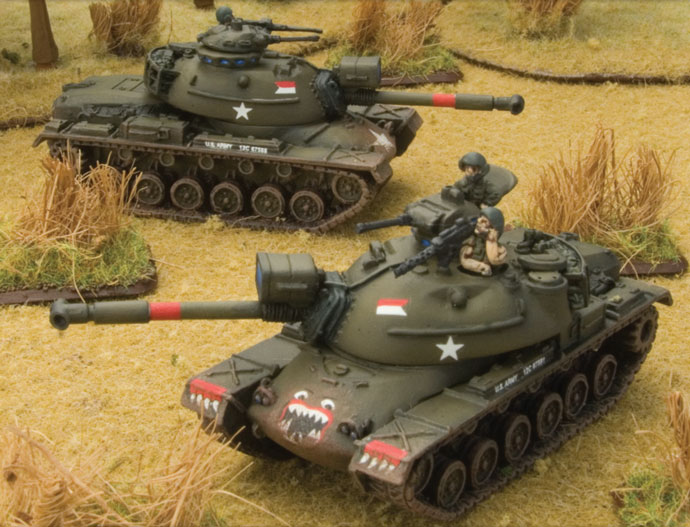
The M109 (155mm) in ‘Nam
 
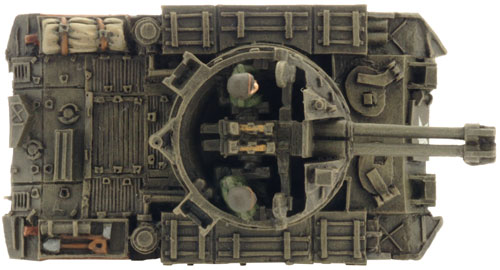
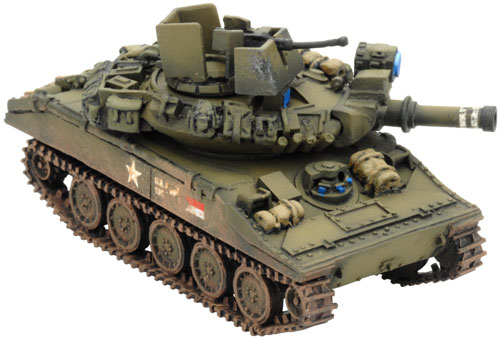
The M108 (105mm) in ‘Nam
 
M109 (155mm) M109 (155mm) (VUSBX08)
M109 (155mm) M109 (155mm)
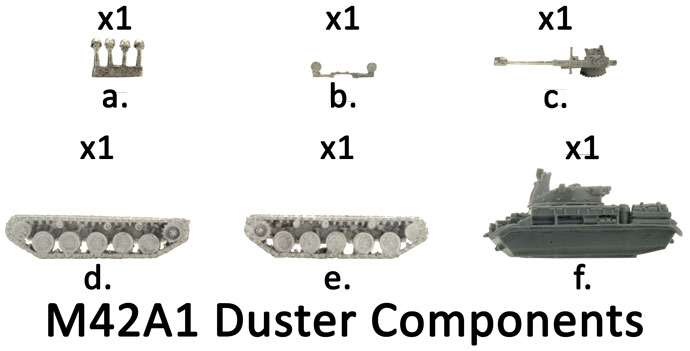
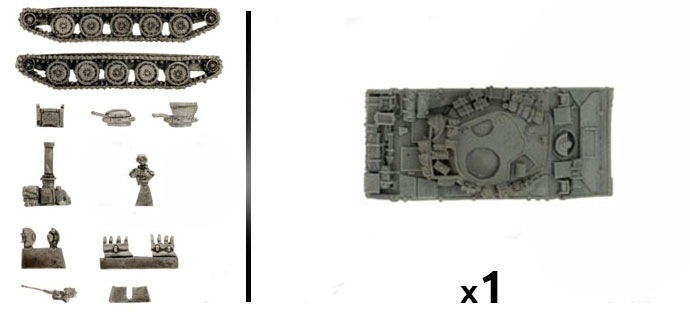
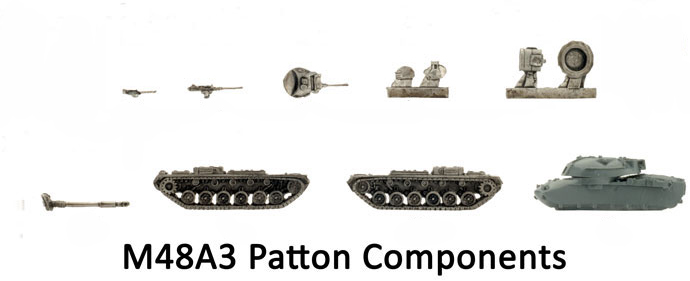
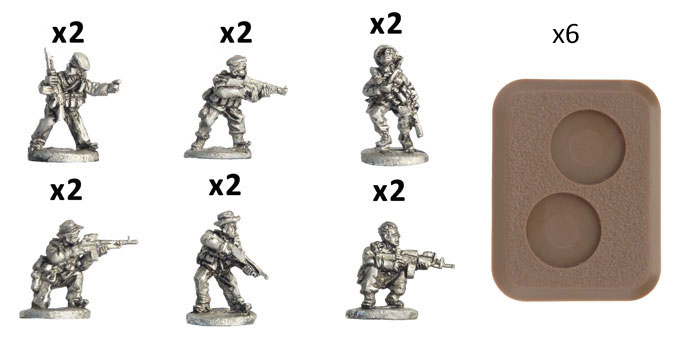
Contents of the M109 (155mm) Box Set
Contact the customer service team at [email protected] if you have any issues with any of the components.
Posted on

M551 Sheridan (VUS002) Assembly Guide

Step 1. Begin assembly by attaching the tracks to the hull of the M551 Sheridan.

Note: Each track has been keyed to correspond with a particular side of the hull; this aids in ensuring the correct orientation of the tracks when assembling the miniature.

Below: The correct alignment for the left-hand side track. Below: The correct alignment for the right-hand side track. Below: The left-hand side track attached to the hull.
M551 Sheridan (VUSBX06) M551 Sheridan (VUSBX06) M551 Sheridan (VUSBX06)
Tip: When referring to left or right-hand side in regards to a Flames Of War miniature, the orientation is determined as if looking at the vehicle from the rear.
Below: The right-hand side track attached to the hull. Step 2. Attach the driver’s vision hatch to the front of the M551 Sheridan. Below: The driver’s hatch vision correctly attached to the front of the M551 Sheridan.
M551 Sheridan (VUSBX06) M551 Sheridan (VUSBX06) M551 Sheridan (VUSBX06)
Step 3. Next, attach the M81 152mm gun to the front of the turret. Below: The M81 152mm gun correctly attached to the front of the M551 Sheridan turret. Step 4. The smoke dischargers attached to the underside of the M551 Sheridan turret. Each side has been keyed to corresponding part. The right-hand side can be seen below.
M551 Sheridan (VUSBX06) M551 Sheridan (VUSBX06) M551 Sheridan (VUSBX06)
Below: The left-hand side smoke discharger recess. Below: The corresponding left and right-hand side smoke dischargers keyed to match the turret.
M551 Sheridan (VUSBX06) M551 Sheridan (VUSBX06)
Below: The smoke dischargers correctly attached to the M551 Sheridan turret. Step 5. Next, attach the loader’s hatch to the top of the turret. Below: The loader’s hatch attached to the top of the turret.
M551 Sheridan (VUSBX06) M551 Sheridan (VUSBX06) M551 Sheridan (VUSBX06)
Step 6. Time to begin assemble of the commander’s hatch. Begin by attaching the .50 cal MG to the mount located at the front of the hatch. See the examples below. Step 7. Next, attach the gun shield to the front of the .50 cal MG.
M551 Sheridan (VUSBX06) M551 Sheridan (VUSBX06) M551 Sheridan (VUSBX06)
Below: The gun shield attached to the .50 cal MG. Step 8. Finally, attach the bird-cage armour to the rear of the commander’s hatch. Below: The fully-assembled commander’s hatch complete with bird-cage armour.
M551 Sheridan (VUSBX06) M551 Sheridan (VUSBX06) M551 Sheridan (VUSBX06)
Step 9. Next, attach the fully-assembled commander’s hatch to the top of the M551 Sheridan turret. Below: With the commander’s turret in place, the M551 Sheridan is ready for the painting table.
M551 Sheridan (VUSBX06) M551 Sheridan (VUSBX06) M551 Sheridan (VUSBX06)
Adding A Vehicle Commander
Step 1. To add a vehicle commander, use the open commander’s hatch rather than the closed commander’s hatch. Step 2. Assemble the commander’s hatch as seen in the steps above. Step 3. Attach a vehicle commander figure to the inside of the open hatch.
M551 Sheridan (VUSBX06) M551 Sheridan (VUSBX06) M551 Sheridan (VUSBX06)
Step 4. Next, attach the fully-assembled commander’s hatch complete with vehicle commander to the top of the M551 Sheridan turret. Below: With the commander’s turret in place complete with vehicle commander; the M551 Sheridan is ready for the painting table.
M551 Sheridan (VUSBX06) M551 Sheridan (VUSBX06) M551 Sheridan (VUSBX06)
US Vehicle Painting Guide
Posted on

M551 Sheridan Spotlight (VUS002)

Includes one  M551 Sheridan

The M551 Sheridan was developed as an amphibious cavalry tank or air-landing tank capable of tackling Soviet tanks. As a result its main armament was an anti-tank missile launcher that could also fire conventional shells. Getting this complex weapon system to work delayed the introduction of the Sheridan, but it finally reached Vietnam in 1968. Once there, its crews liked its firepower, speed, and ability to cross flooded rice paddies, but missed the thick armour of the much heavier M48 and its ability to smash its way through thick jungle.Check out the M551 Sheridan in the online store here… 
The M551 Sheridan was made of light aluminium alloys, like the M113, giving it considerable mobility. It combined this with the punch of a 152mm gun capable of firing ‘beehive’ canister rounds.

Designed by Tim Adcock.
Painted by Mark Hazell.

The M551 Sheridan
The M551 Sheridan in Flames Of War
Contents of the M551 Sheridan Box Set
Contact the customer service team at [email protected] if you have any issues with any of the components.
 
Posted on

M48 Patton (VUS041) Assembly Guide

Step 1. Begin assembly with the tracks.

Tip: Each track is stamped with the letter ‘R’ or ‘L’  and an arrow to indicate correct orientation.

Below: The correct alignment for the left-hand and right-hand side tracks.

Tip: When referring to left or right-hand side in regards to a Flames Of War miniature, the orientation is determined as if looking at the vehicle from the rear.
M48A3 Patton M48A3 Patton M48A3 Patton (VUSBX05)
Below: The left-hand side track attached to the hull. Below: The right-hand side track attached to the hull. Step 2. Attach the main gun to the front of the turret.
M48A3 Patton M48A3 Patton M48A3 Patton
Below: The main gun attached to the turret. Step 3. Next, attach the infrared searchlight to the top of the main gun.

Tip: There is a contoured section on the base of the searchlight that attached to the top of the gun.

M48A3 Patton M48A3 Patton M48A3 Patton M48A3 Patton
Step 4. Attach the loader’s hatch to the top of the turret. Step 5. Next, add the cupola MG to the top of the turret.
M48A3 Patton M48A3 Patton M48A3 Patton
Below: The cupola MG in place. Step 6. Attach the hatch to the rear of the cupola MG. Note: Later versions of the M48A3 added a ring of version blocks below the cupola MG.
M48A3 Patton M48A3 Patton M48A3 Patton M48A3 Patton
Below: The ring of vision blocks attached below the cupola MG. Tip: A loader’s hatch MG can be added to the M48A3 at a small points cost.
M48A3 Patton M48A3 Patton M48A3 Patton
Below: The .30 cal MG attached to the top of the turret for +5 per tank. Below: The .50 cal AA MG attached to the top turret for +10 points per tank. Below: With the .50 cal AA MG in place, the M48A3 is ready for painting.
M48A3 Patton M48A3 Patton M48A3 Patton
Adding Tank Commanders
Step 1. Attach the hatch at the rear of the cupola MG in an open position. Step 2. Add the tank commander figure of choice inside the open hatch. Step 3. Repeat the process if you wish to add a commander figure in the loader’s hatch.
M48A3 Patton M48A3 Patton M48A3 Patton
Below: The commander figure attached to the inside of the open hatch. Below: With the tank commander’s in place, the M48A3 is ready to hit the painting table.
M48A3 Patton M48A3 Patton


Posted on

M48 Patton Spotlight (VUS041)

Includes one M48 Patton Tank with optional MG & .50 cal Cuploa MG upgrades and crew figures

The M48 Patton tank was completely modernised version of the WWII M26 Pershing heavy tank, designed to fight Soviet tanks on a nuclear battlefield. Oddly, many of the lessons of WWII had been forgotten and the M48 lacked a stabiliser and was likely to catch fire when penetrated. Its impressive anti-tank capability was of little use in Vietnam.Much more useful was the M336 canister round, popularly known as ‘beehive’, filled with 1281 steel pellets that turned the tank’s main gun into a giant shotgun. The crews often moved the commander’s machine-gun from inside the cupola to on top of it, added another for the loader.

Check out the M48 Patton in the online store here… 

The M48 tanks went just about anywhere in just about any season, and their firepower proved decisive in battles like the relief of Fire Support Base Gold. There the tanks led a relief column through dense jungle and arrived, guns blazing, ‘just like the late show on TV, the US Cavalry came riding to the rescue’.

Designed by Evan Allen
Painted by Mark Hazell


The M48 Patton in ‘Nam

The Contents of the M48 Patton Box Set
Contact the customer service team at [email protected] if you have any issues with any of the components.
Description of Components
a. Tank commander figures Type A.
b.
Tank commander figures Type B.
c.
Tank commander figures Type C.
d. Tank commander figures Type D.
e. .30 cal MGs.
f.  .50 cal AA MGs
g.
 Cupola MGs.
h. Hatch sprues.
i. Searchlight / vision ring sprues.
k. M41 90mm main guns.
l. Right-hand side tracks.
m. Left-hand side tracks.
n. Resin M48A3 turrets & hulls.
Posted on

Special Force Patrol (VUS782) Spotlight


Includes six two-man Special Forces teams and six two-hole small bases.

To their opponents, the elite Navy SEALs (Sea, Air, and Land) were known as the “Men with Green Faces”, owing to their camouflage face paint. They come silently at night to steal away political leaders, collect intel, destroy supplies, and then disappear.

Check out the Special Forces Patrol in the online store here…

Designed by Evan Allen
Painted by Aaron Mathie

SEALs usually patrolled on their own, but they did sometimes work with larger forces for major operations. Typical patrols were seven men and a South Vietnamese interpreter, but the full platoon could be deployed if a big mission came up.
Navy Seals (VUS782)
Navy Seals (VUS782)
Navy Seals (VUS782)
Navy Seals (VUS782) Navy Seals (VUS782) Navy Seals (VUS782)

The Special Forces in ‘Nam

Navy SEALs had a great deal of leeway with their uniforms so that they could better accomplish their mission. Many wore the Tigerstripe camouflage uniform typical of special forces in Vietnam.

Many SEALs wore denim jeans due to their hard wearing in the damp battlefields of the Mekong.
Head gear was always soft (never helmets) and varied greatly, such as bandanas, berets, or boonie hats. SEALs painted their faces in camouflage colours to blend into the surroundings. This earned them their nickname by the enemy: “Men with Green Faces”.

Navy Seals (VUS782)

Contents of the Special Forces blister pack

Contact the customer service team at [email protected] if you have any issues with any of 
the components.
Posted on

US 4.2″ Mortar Platoon Assembly


4.2" Mortar Platoon (VUS717) The 4.2in Mortars & Crew
Description of Components
a. 3x Gunner figures loading projectile.
b. 4x Gunner figures holding projectile.
c. 3x Standing figures covering ears.
d. 3x Standing figures with hands on hips.
e. 3x Standing figures with hand in air.
f. 4x M30 4.2in mortar tubes with base plate.
Assembling The 4.2in Mortar Teams
Each 4.2in mortar team consists of one M30 4.2in mortar manned by a four-man crew. The crew consists of one of figure type B with the remaining three crew members made up from a mixture of figure types A, C, D and E. Feel free to use which ever poses you think work best in your mortar teams. The 4.2in mortar teams are based using the large six-hole bases included in the blister pack.
The Bases
Description of Components
a. 1x Small three-hole base.
b. 4x Large six-hole bases.
4.2" Mortar Platoon (VUS717)
US Infantry Painting Guide
4.2" Mortar Platoon (VUS717)
Posted on

US 4.2″ Mortar Platoon (VUS717) Spotlight


  includes two Mortar sections each with two M30 4.2in mortars and crew, one Small three-hole base & four Large six-hole bases.

The M30 4.2in (107mm) mortar first entered service with the United States Army in 1951 as a direct replacement for the M2 107mm mortar. Despite being twice the weight of the M2 (305kg vs. 151kg), the M30 enjoyed greater range and an increase in killing power when compared to its predecessor.

Check out the 4.2″ Mortar Platoon in the online store here…

Due to its weight, the M30 was often mounted in vehicles such as the M113 where it could offer mobile fire support to hotspots on the battlefield. When mounted on the ground, the base plate had to be dug-in and covered in sandbags in order to stabilise it. But even with these measures, the recoil caused when the weapon was fired would cause the base plate to shift therefore drastically reducing accuracy.  What’s more, rate of fire was also reduced while the crew were forced to recalibrate the sights with the aiming stakes.

In many cases these were discarded for the lighter and more mobile M29 81mm mortar to allow the platoon to accompany the battalion on combat operations.

Designed by Evan Allen
Painted by Steve London

The M30 4.2in Mortar Teams
4.2" Mortar Platoon (VUS717) 4.2" Mortar Platoon (VUS717)
The M30 4.2in Mortar in ‘Nam
4.2" Mortar Platoon (VUS717) 4.2" Mortar Platoon (VUS717)
Contact the customer service team at [email protected] if you have any issues with any of the components.
Posted on

M42A1 Duster Assembly


Step 1. Begin assembly of the M42A1 by attaching the tracks.
Tip: Ensure that the drive sprocket is towards the rear of the vehicle. Below: The left-hand side track attached to the hull. Below: The right-hand side track attached to the hull.
M42A1 Duster (VUS161) M42A1 Duster (VUS161) M42A1 Duster (VUS161)
Tip: When referring to left or right-hand side in regards to a Flames Of War miniature, the orientation is determined as if looking at the vehicle from the rear.
Step 2. Next, attach the sight group for the Twin M2A1 40mm Bofors gun to the gun itself. There is a notch located just behind the gun shield where the sight is designed to fit into. Below: The sight group attached to the Twin M2A1 40mm Bofors gun.
M42A1 Duster (VUS161) M42A1 Duster (VUS161) M42A1 Duster (VUS161)
Step 3. Once the sight group has been attached to the Twin M2A1 40mm Bofors gun, the gun is ready to be mounted inside the turret. These are two notches located in the turret where the gun is designed to attach; these can be seen in the examples below. Below: The Twin M2A1 40mm Bofors secured in the turret.
M42A1 Duster (VUS161) M42A1 Duster (VUS161) M42A1 Duster (VUS161)
Below: Another angle of the Twin M2A1 40mm Bofors successfully attached to the turret. Step 4. Finally, add a head from the head sprue included in the blister pack to each crew figure located inside the turret. Below: The head sprue included in the blister pack.
M42A1 Duster (VUS161) M42A1 Duster (VUS161) M42A1 Duster (VUS161)
Below: Both crew members complete with heads. Below: With the crew heads in place, the M42A1 Duster is fully-assembled and ready for the painting table.
M42A1 Duster (VUS161) M42A1 Duster (VUS161)
US Vehicle Painting Guide
Posted on

M42A1 Duster Spotlight VUS161


Includes one M41A1 Duster & one American head sprue.

The experience of the Korean War led US Army officials to begin the phasing out of the M24 Chaffee in favour of designs based around the more modern M41 Walker Bulldog. Included in the M24 family of vehicles was the M19 GMC. Developed towards the end of the Second World War, the M19 was armed with two of the highly effective 40mm Bofors anti-aircraft guns mounted in an open-topped turret capable of traversing 360º.

Check out the M42A1 Duster in the online store here…

Since the 40mm Bofors was still considered an effective anti-aircraft weapon, the turret of the M19 was simply mated with chassis of the M41 to create the M42 or Duster as it became known as by troops serving in Vietnam.

The first M42s begun arriving in Vietnam during 1966 and as it become clear that the threat of North Vietnamese air power would never materialise, the M42 was quickly put to work in a ground support role. With each gun capable of firing 120 rounds per minute, the 40mm rounds of the M2A1 Bofors proved devastating against both unarmoured ground targets and massed infantry attacks.

Designed by Tim Adcock
Painted by James Brown

The M42A1 Duster in Flames Of War Vietnam 
 
Contents of the M42A1 Duster Blister Pack
Contact the customer service team at [email protected] if you have any issues with any of the components.
Description of Components
a. 1x Crew head sprue.
b. 1x
Twin M2A1 40mm sight group.
c.
1x Twin M2A1 40mm gun.
d. 1x Right-hand side track.
e. 1x Left-hand side track.
f. 1x Resin M42A1 Duster turret & hull.