with Hauke Kolle
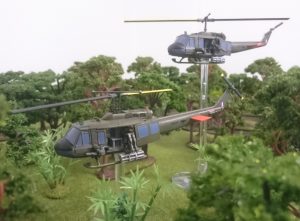
Although not nearly as numerous or famous as their American counterparts, the Royal Australian Air Force (RAAF) also operated helicopter gunships in Vietnam. While waiting for the bureaucrats in Australia to approve the purchase of gunship kits, the men on the ground traded beer for weaponry and modified the first gunship on their own. Thus, ‘Ned Kelly’, the first of four Australian gunships was created. They were piloted by airmen of No. 9 Squadron, RAAF, who were flying Australia’s UH-1H ‘Hueys’. The ‘Bushrangers’ provided the RAAF with the firepower to escort their medevac operations, along with the ability to directly support the infantry. The RAAF operated under quite restrictive rules of engagement, giving the infantry the impression they were not as brave as the American helicopter pilots (who they considered insane anyway!)

For day-to-day operations, out of the four helicopters, two ships would form a ‘Light Fire Team’, with the third helicopter held on stand-by and the fourth undergoing maintenance. The ships would cycle regularly between the roles, to guarantee their safe operation.
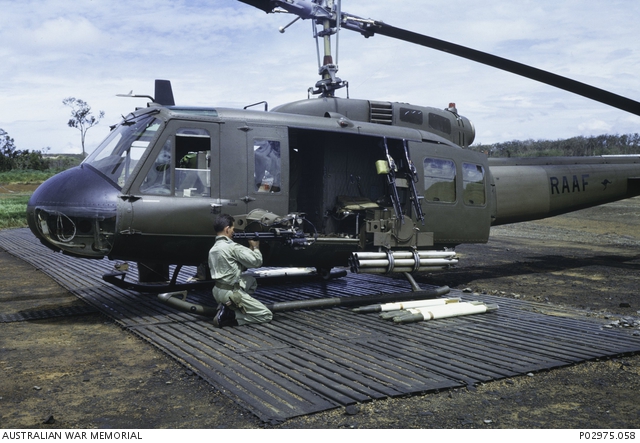
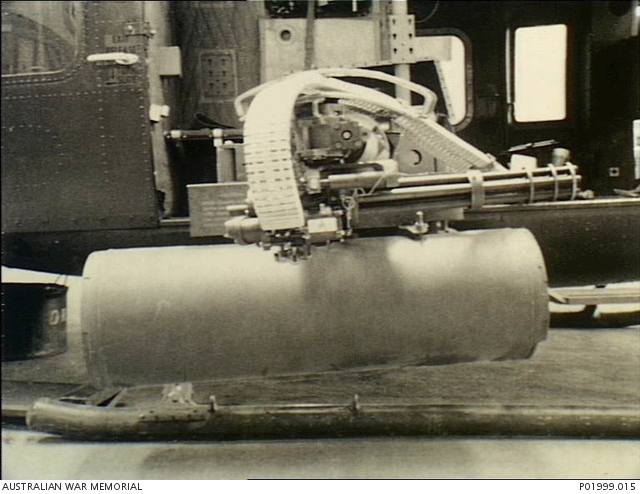
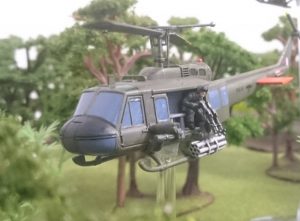
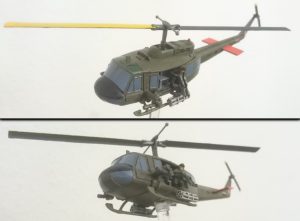
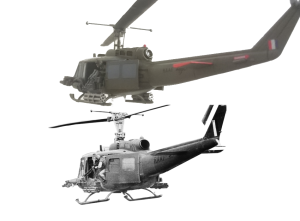
Whereas the Americans mostly used the smaller UH-1B and UH-1C before introducing the AH-1 Cobra as a dedicated gunship, the Australians also converted the UH-1H, which was a transport-helicopter with a more powerful engine than the earlier D model. It was able to carry the same armament as the older models with ease, consisting of two M134 7.62mm ‘Miniguns’, each mounted beneath a pylons on either side of the aircraft and two M157 2.75″ 7-Tube rocket pods mounted beneath the weapon mounts of the two door gunners’ twin-M60 machine-guns. Yes, twin M60s! However any meaningful transport capacity was lost, since the passenger compartment was filled with ammo boxes for all those guns.
Looking at images of the different gunships you’ll notice that the miniguns aren’t always mounted in the same place. Some images show them mounted just behind the cockpit, while others have them mounted at the helicopter’s ‘waist’. You can find images of ‘Ned Kelly’, a UH-1B and the first Bushranger on the Australian War Museums excellent website and see that it carries all of its armaments in this compact manner. The H-model Huey gunships have their miniguns mounted on forward pylons, for easier ammo supply and less interference with the door gunners.
(For a short history of No. 9 Squadron, RAAF in Vietnam see: https://www.awm.gov.au/collection/U53557)
How to make your own UH-1H ‘Bushranger’ gunships
Battlefront doesn’t offer a complete kit to build the slightly bulkier gunships based around the UH-1H, but we will not let that stop us. If you’re playing ‘Nam and/or Team Yankee, chances are you will have some of the spare parts needed for our little conversion on hand, anyway, or know someone who does. If not, take a lesson from history, grab a case of beer and find a US air base near you and do a trade!
What you’ll need:
1x VUSBX17 UH-1 Huey Aviation Platoon (Plastic) -OR- TUBX07 Huey Helicopter Flight (Plastic)
From this you’ll need the entire kit. Pay particular attention to the M60s!
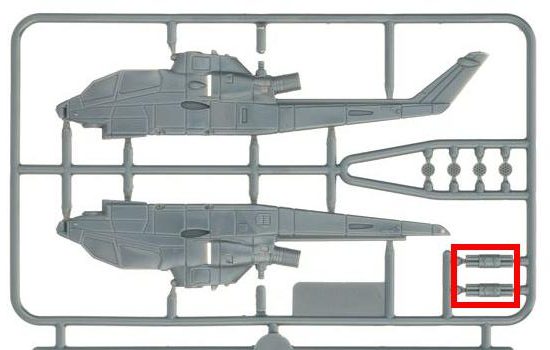
VUSBX16 AH-1 Cobra Gunships (plastic) -OR- TUBX05 AH-1 Cobra (Plastic)
The Cobra sprue comes with 2 M157 rocket pods. If you know Team Yankee players who own Cobras, you might want to ask them, as they usually don’t use the small rocket pods for their 80’s-era gunships (they usually pack the larger, enclosed pods and TOWs).
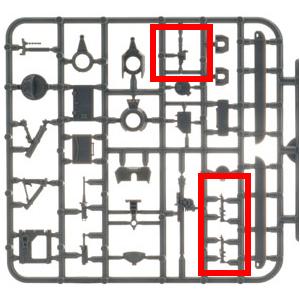
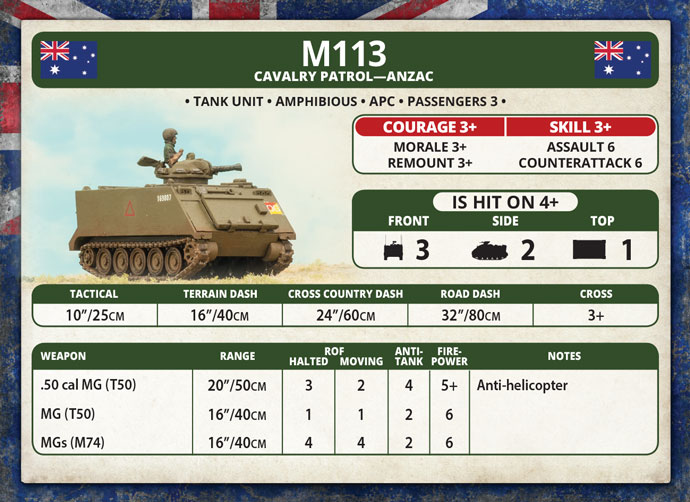
1x VUSBX07 M113 Platoon -OR- TUBX03 M113 Platoon (Plastic)
From this sprue we’ll need the M134 ‘Miniguns’. Each M113 plastic sprue comes with one minigun, so we’ll need four sprues – the exact contents of a platoon box. If you plan on running ANZACs in ‘Nam, you can use the M113s for that (and since ANZAC M113 use special turrets, you won’t even miss the miniguns). If not, you might want to ask around for the bits.
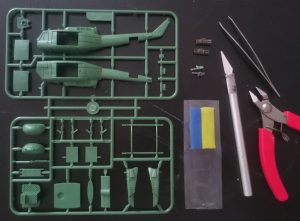
For one Bushranger you should have these components ready: 1x Huey sprue, 2x M134 Minigun from the M113 sprue, 2x M157 rocket pod from the Cobra sprue, a modeling knife, a pair of pliers, some modeling putty. Not in the picture: some glue and a bit of water to dip your modeling knife into while modeling the pylons and mountings.
To get started all you need to do is build your UH-1 Huey as normal, but leave out Step 11 for now (adding the door gunners).
NOTE: I highly recommend priming and painting the door gunner models separately, paint the helicopters interior first and then glue them in, after.
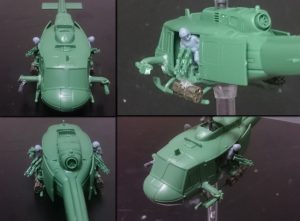
Conversion #1: Twin-M60s and rocket pods
When assembling the doorgunners’ machine-guns, attach a second M60 to the gun mount, parallel to the first one. You can do this one of two ways. Method one: File or clip off the mounting of one M60 (I suggest the one with the grip modeled). Then file of the pins on both M60s, so they are easier to glue together and combine them into a twin-M60. Attach the twin-M60 as normal.
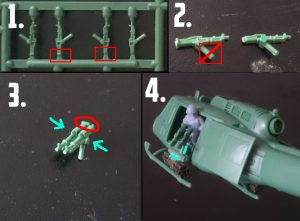
Alternatively you can clip of the mounting of both M60s, file off the pins, glue them together and then re-attach the mounting in the center and glue your twin-M60s in the middle of the mounting.
Then, add the armament to turn it into a gunship! The rocket pods are mounted beneath the door gunners’ M60 mounts. (Note: I used metal rocket pods from an old kit for my conversion, but going with the new plastic ones is even better, as they are easier to glue to the other plastic parts and weigh less.) The 7-rocket M157 rocket pods were later upgraded to 19-rocket M200 rocket pods; so if you want to use those, you absolutely can!
Conversion #2: Miniguns
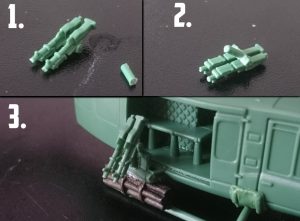
The miniguns are a bit trickier to do right. The easiest way would be to simply file of the pins of the guns and glue them directly to the sides of the fuselage. However, ideally you model the pylons (sometimes called booms) and their mounting. The mountings you can attach with the model still on the sprue; put a bit of modeling putty beneath the windows, between cockpit and transport compartment. Dip the blade of your modeling knife in a bit of water (so the putty won’t stick to it) and cut away the excess putty. Then, use the pliers to carefully model two rails on either side of the mounting. Finally flatten the central portion, where the pylon will be attached later on.
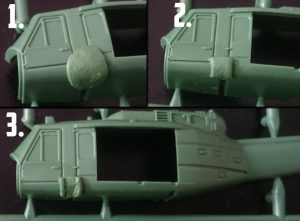
The pylons can easily be made out of modeling putty like green stuff. Simply roll a small amount of putty into cylinders, 1-2 millimeters in diameter and 6-8 millimeters long. While the putty is soft, use the plastic minigun bits to form a socket to glue them into, later. The miniguns need to ‘hang’ down from the pylons’ tips. Once the putty has hardened, glue on the miniguns. They might not fit perfectly. In that case just glue them on and fix any open cracks and crevices with a bit of modeling putty.
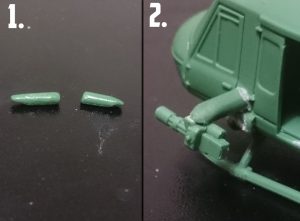
For a final touch you might want to clip down the rear of the miniguns a bit and add the ammo belts. For these I once more suggest using modeling putty. After mixing it thoroughly, form a small ball of 1-2mm diameter (to get the right mass) and then roll it between your fingers, until you have a thin line. The ammo belts attach to the outer side of the miniguns and feed back into the helicopter through a slit in the door. I modeled mine slightly wrong (feeding around the door and to the inner side of the miniguns…), so keep an image of the correct ammo belt handy at all times!
To make modeling a little easier, use a hobby knife and pliers. Before modeling, dip these into water, so your freshly modeled ammo belts won’t stick to your tools. Use the pliers to flatten the top and sides of the ammo belts. When everything has thoroughly dried (over a few hours), prime and paint your new light fire team.
Painting the Bushranger
I am not much of a painter. Gaming takes clear preference for me, however I offer you this guide for painting the bushranger, so you have something to go on. I have no doubt, that your models will look a lot nicer than mine!
For most of the process you can follow the painting guide for helicopters in ‘Nam (pages 203 and 207-208) and this video guide for painting the Cobra
https://www.youtube.com/watch?v=67JZsR_5Qd4.
First I primed the model. I had glued everything together in one go, so that included the doorgunners. I painted the hull in olive drab (Vallejo Model Color 70.887 Brown Violet) and then drybrushed the model lightly with a mixture of VMC Brown Violet and VMC 70.886 Green Grey, to add some wear and tear.
Next I painted the helicopters interior and the rocket pods with Vallejo Game Color 72.050 Cold Grey. If you have VMC London Grey available, use that. Then I painted the windows (except for the one on top) with VGC 72048 Sombre Grey. A slightly darker fit would be VMC Luftwaffe Uniform or Colours of War Luftwaffe Blue. The top windows I painted with VMC 70923 Luftwaffe Camouflage Green, since I did not have the recommended VMC Flat Green available. You can see that I had a little accident with one of the windows; that’ll be cleaned up later.
The Hueys upper nose and the doorgunners’ boots then got some black paint. I used VGC 72051 Black, as I didn’t have the VMC variant available. All things metal then got painted with VGC 72155 Heavy Charcoal (alternatively VMC Worn Rubber).
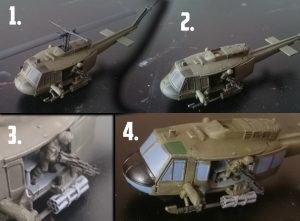
Now the door gunners got their uniforms painted with VMC 70924 Russian Uniform, except for gloves, helmet and chest plate. Time for details. I started with the door gunners, painting their faces with VMC 70955 Flat Flesh. They later got a bit of Army Painter Strong Tone quickshade for added depth.
The rocket pods got light grey highlights and were done. Miniguns, ammo belts and M60s got highlights with VGC Cold Grey, then were dry brushed with VMC 70863 Gunmetal Grey. All windows and any surfaces I wanted to apply decals to got a coat of Vallejo Gloss Varnish 70510.
For a bit more shading I applied some Army Painter Strong Tone wash in the crevices. Finally I cleaned up any areas I had botched earlier with a fine brush and a steady hand. Almost done.
Decals and markings
Of course you’ll want to use the ‘RAAF’ decal instead of the US Army one on the tail boom. Place it roughly in the middle between the tail fins and the point where the tail attaches to the main compartment. Place the flag (red-white-blue) on the tail fin, directly above the area where it attaches to the tail. If you feel brave and have a steady hand, pick a very fine brush and some black paint, to paint the kangaroo onto the tail. Don’t worry, it’s a lot simpler than it looks.
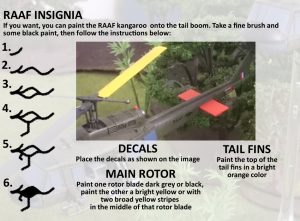
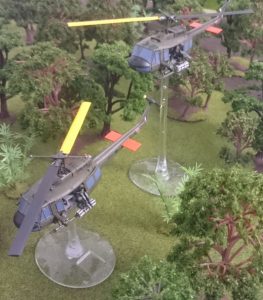
When you paint the bright coloured rotor blades and tail fins do yourself a favor and carefully prepare them with a sand-tone base coat first. This will bring the colours out a lot brighter and easier (although you will still need a few layers for a nice, even look). I used VGC 72006 Sun Yellow and VGC 72009 Hot Orange, because I did not have the VMC alternatives at hand.
You’ll find images of bushrangers in various states online, some of them no “Danger!”-arrows on the tail boom, some have two broad stripes on one rotor blade, others have a single rotor blade in bright yellow, to mark their position to aircraft higher up. You can paint them as I have painted them or research your own variants for more variety!
One last thing
The Bushrangers have no official Unit Card and no entry in the force organization plan. The simplest solution is to just use the models as a stand-in for a US Gunship Aeroweapons Platoon (page 83 of ‘Nam) taken as a US Allied Support Unit. This Unit can have no more than two helicopters, neither of which can be upgraded to become Gatling Gunships. I created a Unit Card myself, if you want to use that.
 Special thanks to Battlefront and my friend Emanuel, who sponsored the parts I lacked for this conversion!
")
")
")
")
")
")
")
")
")
")
")
")
")
")
")
")
")
")
")
")
")
")
")
")
")
")
")
")
")
")
")


")
")
")
")
")
")
")
")
")
")
")
")
")
")
")
")
")
")
")
")
")
")
")
")
")
")
")
")
")
")
")
")
")
")
 (VAN707)")
 (VAN707)")
 (VAN707)")
 (VAN707)")
 (VAN707)")
 (VAN707)")
 (VAN707)")
 (VAN707)")
 (VAN707)")
 (VAN707)")
 (VAN707)")
 (VAN707)")
 (VAN707)")
 (VAN707)")
 (VAN707)")
 (VAN707)")
 (VAN707)")
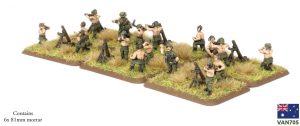
 (VAN705)")
 (VAN705)")
 (VAN705)")
 (VAN705)")
 (VAN705)")
 (VAN705)")
 (VAN705)")
 (VAN705)")
 (VAN705)")
 (VAN705)")
 (VAN705)")
 (VAN705)")
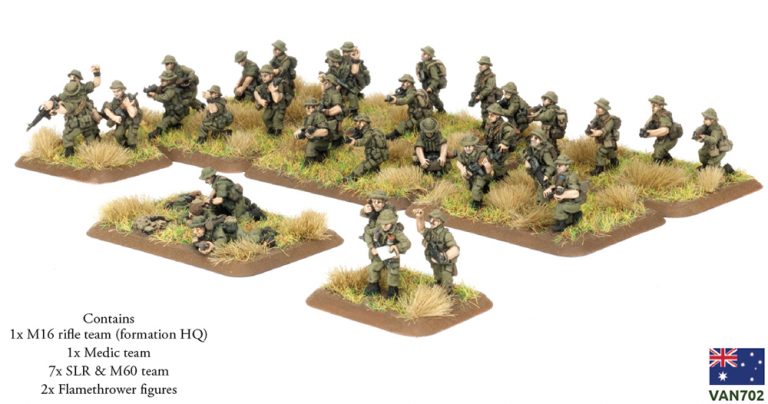
 (VAN702)")
 (VAN702)")
 (VAN702)")
 (VAN702)")
 (VAN702)")
 (VAN702)")
 (VAN702)")
 (VAN702)")
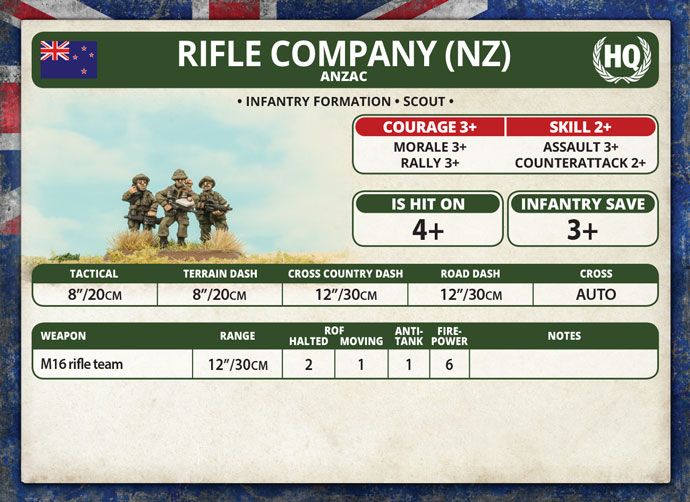
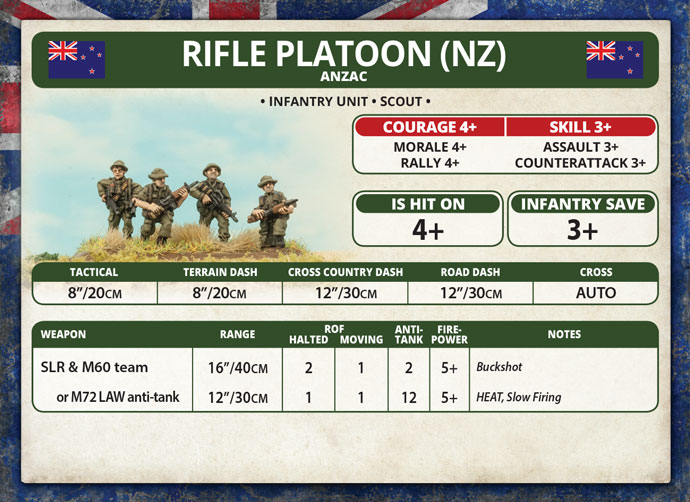
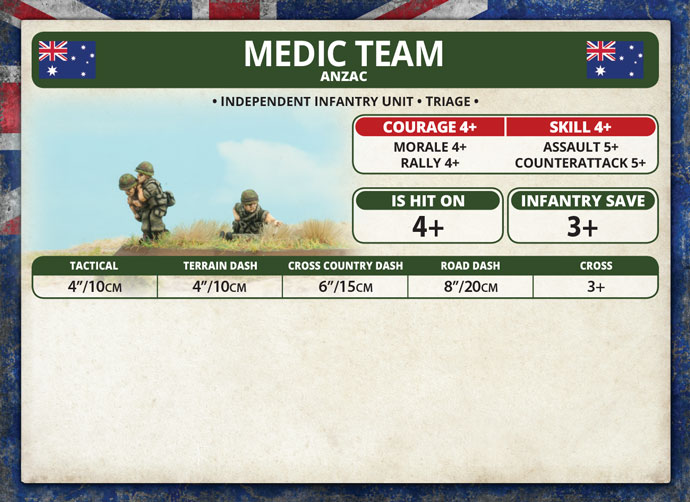
 (VAN702)")
 (VAN702)")
 (VAN702)")
 (VAN702)")
 (VAN702)")
 (VAN702)")
 (VAN702)")
 (VAN702)")
")
")
")
")

")
")
")
")
")
")
")