Posted on

Props Forever! The Skyraider In Vietnam

with Mike Haught & Phil Yates

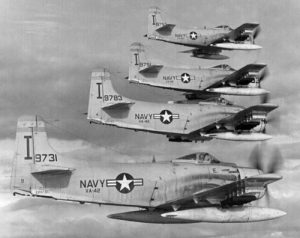
Few aircraft have the raw firepower and durability of the Douglas A-1H Skyraider. Derided for being a propeller-driven aircraft in the new Jet Age, the ‘Spad’ not only demonstrated that it had a mission to accomplish, it proved that there was still a place for ‘slow movers’. The Skyraider’s legacy paved the way for powerful modern attack aircraft like the venerable A-10 Warthog.

Look more about the Skyraider in ‘Nam here…
Check out the Skyraider in the online store here…

When I was young I was obsessed with the four-engined B-17 bomber from World War II. I built countless models of the famous bomber, drew doodles of B-17s bombing factories on my school papers, and was mesmerized by getting to see the Commemorative Air Force’s B-17G ‘Sentimental Journey’ up close and personal for the first time. To this day I still love that aircraft. It was rugged, powerful, and had an impressive arsenal. So when my dad told me that the AH-1 Skyraider, a single seat Navy dive bomber, could deliver the same payload as a B-17 (8000lbs or 3600kg of ordnance), I was amazed and instantly made it one of my favourite aircraft.
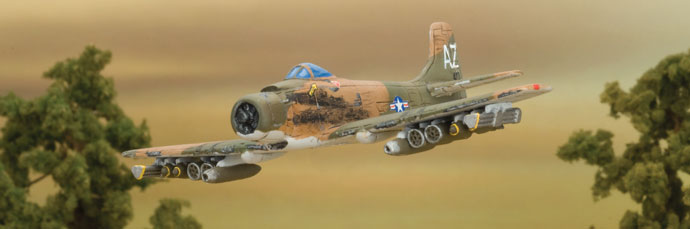
Development
During World War II, the US Navy needed to replace its aging Dauntless dive-bomber. The Douglas Aircraft company went to work developing a replacement. After a few false starts and fierce competition from aircraft-designer rivals such as Boeing and Curtis, Douglas produced the magnificent XBT2D-1, which was quickly nicknamed the Dauntless II.

The Dauntless II first took to the air on 18 March 1945 and its trial flights greatly exceeded the Navy’s expectations and blew away all of the competing airframes. It was powerful, rugged, and extremely easy to maintain. The Navy instantly ordered nearly 600 planes and designated the plane as the AD-1 Skyraider in February 1946.

The airframe was incredibly rugged and could carry up to 8000lbs (3600kg) of ordnance, the equivalent or superior to many of its contemporary bombers. The plane’s fuel capacity meant that it could spend up to 10 hours in the air, meaning it could stay on station and help local troops for a very long time. It also had a pair of 20mm cannons, one in each wing to offer additional firepower.

Operational History
The Skyraider entered seamlessly into the Navy’s service. A few structural problems were ironed out and the aircraft became a quick favourite for the pilots. The Skyraider’s remarkable and versatile payload also appealed to the US Marines who also used the aircraft to support its strike forces.

Korea
The AD-1’s first combat action was over Korea in 1950-1953. The plane’s heavy payload far exceeded what the jets of the time could deliver, and so were used as the primary ground-attack aircraft of the Navy and Marines. The AD-1 earned the nickname ‘Able Dog’ after sterling service in the Korean War.
During the war several new variants were developed, including early-warning, submarine-hunting, and the up-armed AD-4 with two more 20mm cannon added for a total of four. Over 1050 AD-4 aircraft were built. Following the war, the AD-4 was again updated as the AD-6, which received a more powerful engine, added armour protection for the pilot, and was made capable of delivering nuclear weapons. Over 710 AD-6 Skyraiders were built and saw service in the Navy, Marines, and the Air Force.In 1962, the AD-6 was renamed the A-1H and soon took on the nickname ‘Spad’, a derogatory reference to the fact that it was a propeller aircraft in the jet age. However, the Spad was about to prove its worth once more in Southeast Asia.
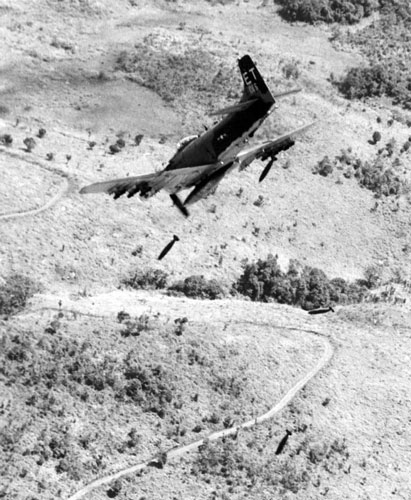
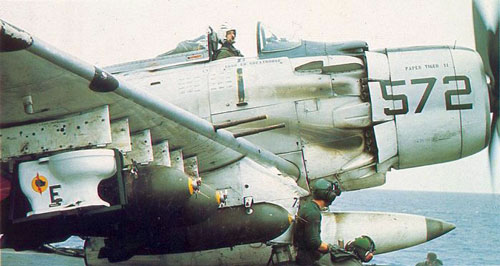
Vietnam
In the early days of the US involvement in the Vietnam conflict, the Geneva Convention forbid the US military to use jet aircraft in a military role. Enter the Skyraider! The powerful aircraft served the Air Force and Navy well for those first few months until the restriction was lifted and the more powerful bombers were brought online. However, that was not the end of the Spad’s career in Vietnam. It had a lot more still to offer.
As the years wore on, the Skyraider became a ubiquitous weapon in the US military’s arsenal. Its 15 hard points under its wings could carry and deliver an assortment of torpedoes, mine dispensers, minigun pods, white phosphorous bombs, high explosive rockets, 500lb bombs, cluster bombs, and napalm. The aircraft’s own 20mm cannon could unload a further 800 rounds. Each aircraft was an army unto itself. Its slow speed was an asset because it allowed the aircraft to deliver its weapons on target with excellent accuracy. Jet attack planes were sometimes too fast to deliver accurate strikes, making the Skyraider better suited for close air support.Skyraider ground attack missions included preparing landing zones for helicopters, supporting friendly infantry, covering rescue operations, disrupting known North Vietnamese supply lines, and whatever else asked of it. If a pilot completed his mission and still had ordnance left, he would radio the local friendly forces and get a target to spend the last of his payload. Never did a Skyraider return to base or the aircraft carrier with ordnance still remaining! They became a major and vital part of the Vietnam War.Towards the late 1960s, the Skyraider was slowly (and reluctantly, according to many Spad pilots) replaced by the new A4 Skyhawks and A6 Intruder jet attack aircraft. However, there were always missions that the Skyraider could do best. The aircraft soldiered on in US service until the last one was removed from active duty in 1972. However, a good number of Skyraiders were given to the South Vietnamese air force, which made use of them until the conclusion of the war.
6-Million Pounds Later…
In October 1965, the USS Midway was scheduled to deliver the six-millionth pound of ordnance on Vietnam. To mark the occasion, the crew and pilot, Commander Clarence W. Stoddard, arranged for a special bomb to be dropped: a toilet!The toilet was rigged with a bomb rack, tailfins and nose fuse. It was dropped over a target in South Vietnam and the local Forward Air Controller reported that it whistled all of the way down before crashing into the ground below!
A New Era
The passing of the Skyraider from the US military marked the end of the noble lineage of propeller-driven carrier-based attack aircraft and the full takeover of the jet. However, the transition was not without problems and after years of trying to get attack jets to work, the aircraft designers went back to the Skyraider for inspiration for its next generation of ground support aircraft. The experience of the slow, powerful, and rugged Skyraider would be incorporated into the Republic A-10 Thunderbolt II, blending the best the Skyraider had to offer with modern jet technology.
~ Mike.


Posted on

Hanoi’s Saigon Front: Vietnamese Forces in the Battle for Saigon

by Dave Wiggins
The People’s Army of Vietnam viewed the area around Saigon as critical to winning the Vietnam War. Their B2 Front commanded the North Vietnamese forces in and around Saigon and the Mekong Delta. The battles there were tough and hard fought. Both sides made major offensives like the American Operation Cedar Falls and the North Vietnamese Tet offensive, but neither side was able to decisively beat the other in combat. In the end it was the North Vietnamese willingness to take casualties and keep fighting that won the war for them after the United States finally withdrew from Vietnam after seven long years

The Forces of B2 Front
During the first stages of the war, the forces in the south were largely from the People’s Liberation Armed Forces (PLAF) of the National Liberation Front (NLF). These were known to the South Vietnamese as VC or Việt Cộng, a contraction of Việt Nam Cộng-sản (Vietnamese communist). American soldiers referred to communist forces in general, both Vietcong and North Vietnamese, as Viet Cong. In 1965 B2 grouped its forces, supplemented by a big influx of regular army regiments from the North Vietnamese People’s Army of Vietnam (PAVN), into three divisions: 5th, 7th, and 9th. These divisions were officially ‘Main Force’ PLAF divisions, disguising the presence of the PAVN regulars. The Main Force divisions were composed of three regiments, and each regiment had a designated combat speciality: mobile operations, attacking fortifications, or ambush operations, but were able to fight in any situation that might present itself. In addition to the three Main Force divisions, B2 Front also commanded up to 3 sapper battalions (assault commandos), 2 rocket artillery regiments, and an air defence battalion, and ‘Local Force’ guerillas operating at the district and village level.

Hanoi’s Saigon Front: Vietnamese Forces in the Battle for Saigon

B2 Front in South Vietnam
It can be very hard to find information on PAVN units, so I have summarised the main force divisions fighting under B2 Front. In late 1969, the Front also commanded three (4th, 7th, and 8th) sapper battalions, severa independent regiments, two rocket regiments, and an anti-aircraft battalion. By this stage the VC contribution had massively declined after three years of fighting the American forces and the losses in the Tet offensive. The main source was Chiangshan’s posts on http://www.armchairgeneral.com/forums/showthread.php?t=82511.
Sư Đoàn 5 (5th Division)
Formed Sep 1965. Operated in the Mekong Delta. Rebuilt with PAVN regiments after Tet offensive. These regiments had been formed for the First Indochina War against the French
.
Sư Đoàn 7 (7th Division)
Formed Jun 1966. Operated south of
the Mekong Delta. Created from 312th ‘Victory’ Division which then rebuilt its regiments as 141B and 165B.
Sư Đoàn 9 (9th Division)
Formed Sep 1965. Operated in the
Iron Triangle. First division formed in
the south. Created from independent
regiments. Suffered heavy casualties in Operation Junction City.
Trung Đoàn 4 (4th Regiment) until Apr 1968.
Name: ‘Đồng Nai’ (Name of province).
Trung Đoàn 33 (33rd Regiment) from Jul 1968.

Formed from 101B and 101C, 325th Division.
Name: ‘Trần Cao Vân’ (Anti-French leader).
Trung Đoàn 12 (12th Regiment)
Previously 165A Regiment, 312th Division
Name: ‘Lao Hà Yên’ (Name of province)
Trung Đoàn 1 (1st Regiment)
Previously 812th Regiment, then 271A
Regiment or Q761 of B2 Front
Name: ‘Bình Giã’ (Name of village)
Trung Đoàn 5 (5th Regiment) until Jun 1970.
Known to US as 275th Regiment
Trung Đoàn 3 (3rd Regiment) from Jul 1970.

Formed from 1st Battalion, 5th Regiment
Trung Đoàn 14 (14th Regiment)
Previously 141A Regiment, 312th Division
Name: ‘Ba Vì’ (Mountain range)
Trung Đoàn 2 (2nd Regiment)
Previously 272A Regiment or Q762 of B2 Front
Name: ‘Đồng Xoài’ (Name of town)
Trung Đoàn 88 (88th Regiment) from Sep 1967 to Sep 1968. Previously 88A, 308th Division
Name: ‘Tu Vũ’ (Name of village)
Trung Đoàn 174 (174th Regiment) from Oct 1968 Previously 174A Regiment, 316th Division

Name: ‘Cao Bắc Lạng’ (1949 campaign)
Trung Đoàn 16 (16th Regiment) until late 1967
Previously 101A Regiment, 325A Division
Name: ‘Trần Cao Vân’ (Anti-French leader)
Trung Đoàn 52 (52nd Regiment) Sep to Nov 1967

Previously with 320A Division
Name: ‘Tây Tiến’ (Western Progress)Trung Đoàn 209 (209th Regiment) from Jan 1968
Previously 209A Regiment, 312th Division
Name: ‘Sông Lô’ (Lô River)
Trung Đoàn 3 (3rd Regiment) until Sep 1968
Previously 3rd or 273rd Regiment of B2 Front
Trung Đoàn 3B (3B Regiment) from Oct 1968 to Sep 1969. Previously 88th, 5th Division

Name: ‘Tu Vũ’ (Name of village)Trung Đoàn 3 (3rd Regiment) from Oct 1969 Previously 95C Regiment, 325C Division
Name: ‘Nguyễn Thiện Thuật’ (Revolutionary)
PAVN divisions and regiments had a confusing variety of names. In part this was caused by the need to send reinforcements south to rebuild destroyed regiments. Regiments could be rebuilt with the letter B (or C or even D in some cases) after their number, or simply replaced with another regiment. As a result 33/7, 101/7, 101B/325, and 101C/325 all refer to the same regiment, which might also be referred to as 4/7 after the regiment it replaced.The Vietnamese also deliberately caused confusion by referring to units by different names, such as Công Trường 9 (Construction Site 9), a codename for the 9th Division.

Hanoi’s Saigon Front: Vietnamese Forces in the Battle for Saigon

The North Vietnamese were adept at concealing their true order of battle and the level of casualties they were sustaining. A continuous stream of replacement soldiers from North Vietnam followed the Ho Chi Minh trail south through Laos and Cambodia to replace on-going casualties. In the aftermath of major battles, whole PAVN regiments would be sent south to replace those lost in battle. These were replaced in the PAVN’s order of battle with new regiments with the same number, but with a B suffix, and on arrival in the south were renamed to replace the destroyed regiment. As you can imagine, this led to considerable confusion in American intelligence estimates which identified 308th, 312th, 320th and 325th PAVN Divisions as operating in the area


COSVN’s Strategy
The forces of B2 Front showed themselves to be fully capable of defeating the South Vietnamese Army of the Republic of Vietnam (ARVN) on the battlefield more often than not. Indeed, B2 Front’s dry season campaign of 1964 had as one primary objective the engagement and defeat of the most capable ARVN units, leading to the largescale intervention of the United States in 1965. Early defeats against the much better equipped and led US Army forced B2 Front’s leadership to re-evaluate their strategy.
General Tran Van Tra, commanding B2 Front, and his planners recognized that they could not expect to decisively

defeat the US forces in Vietnam. The US forces were more mobile, and could bring superior firepower to bear in almost any situation. Also, since the US controlled the skies of South Vietnam, resupply of B2 Front forces so as to maintain their combat effectiveness would be a considerable challenge. Thus, strategy shifted. Rather than fighting large battles to defeat US forces, B2 Front began a long war of attrition designed to inflict continuous casualties and ultimately demoralize the US forces

Hanoi’s Saigon Front: Vietnamese Forces in the Battle for Saigon

Despite appearances, the 1968 Tet offensive was not a departure from this strategy. While it was a large-scale offensive, both in numbers of troops and the area covered, they still avoided large battles whenever possible. The targets were individual towns, population centres, communications centres, and other important infrastructure. The speed and violence of the US Army’s response caught the Vietnamese off guard, leading to massive casualties, and ultimately another large influx of North Vietnamese regular regiments. Despite this setback, B2 Front’s strategy to end American involvement in Vietnam by making the Americans tired of the war and forcing them to leave Vietnam continued.

With the American departure in 1971, large-scale battles against the ARVN resumed, now supported by artillery regiments and even tanks. With these battles B2 Front was instrumental in bringing about the ultimate collapse of ARVN forces and the fall of South Vietnam.
~ Dave

Posted on

M113 M74C & T50 Turrets Assembly


a. 1x M113 Driver head sprue.
b. 2x M113 T50 turrets.
c. 2x M113 T50 main guns.
d.
2x M113 T50 turret hatches.
e. 2x M113 M74C turrets.
f. 2x M114 M74C hatches.
g. 4x Vehicle commander figures.
Assembling The M113 T50 Turret
Step 1. Attach the main gun to the front of the turret ensuring that the shorter .30 cal MG is on the right-hand side. Step 2. Next, attach the hatch to the top of the turret.
Tip: When referring to left or right-hand side in regards to a Flames Of War miniature, the orientation is determined as if looking at the vehicle from the rear.
M113 M74C & T50 Turrets (VAN243) M113 M74C & T50 Turrets (VAN243) M113 M74C & T50 Turrets (VAN243)
Below: The hatch attached to the turret. Step 3. The T50 turret simply replaces the weapons turret of the stock M113.

Learn more to assembly the M113 here…

Below: The fully assembled M1113 complete with T50 turret.
M113 M74C & T50 Turrets (VAN243) M113 M74C & T50 Turrets (VAN243) M113 M74C & T50 Turrets (VAN243) M113 M74C & T50 Turrets (VAN243)
Adding A Vehicle Commander
Step 1.Attach the hatch in an open position. Step 2. Add the vehicle commander into the open hatch. Below: The M113 with T50 turret fully assembled complete with vehicle commander.
M113 M74C & T50 Turrets (VAN243) M113 M74C & T50 Turrets (VAN243) M113 M74C & T50 Turrets (VAN243)
Assembling The M113 M74C Turret
Step 1. Attach the M74C turret hatch to the rear of the turret. Step 2. The M74C turret simply replaces the weapons turret of the stock M113.

Learn more to assembly the M113 here…

Below: The fully assembled M1113 complete with M74C turret.
M113 M74C & T50 Turrets (VAN243) M113 M74C & T50 Turrets (VAN243) M113 M74C & T50 Turrets (VAN243) M113 M74C & T50 Turrets (VAN243) M113 M74C & T50 Turrets (VAN243)
Adding A Vehicle Commander
Step 1.Attach the hatch in an open position. Step 2. Add the vehicle commander into the open hatch. Below: The M113 with M74C0 turret fully assembled complete with vehicle commander.
M113 M74C & T50 Turrets (VAN243) M113 M74C & T50 Turrets (VAN243) M113 M74C & T50 Turrets (VAN243)
Posted on

M113 FSV Turret Assembly


Step 1. Begin by attaching the FSV deck to the hull of the M113.

Learn how to assembly the M113 here…

Step 2. Attach the driver’s hatch to the FSV deck.
M113 FSV Turret (VAN242) M113 FSV Turret (VAN242) M113 FSV Turret (VAN242)
Below: The driver’s hatch attached to the FSV deck. Below: The M113 FSV hull fully assembled. Step 3. Next, attach the main gun to the front of the turret.
M113 FSV Turret (VAN242) M113 FSV Turret (VAN242) M113 FSV Turret (VAN242)
Below: The main gun attached to the turret. Step 4. Next, attach the hatches to the top of the turret.
M113 FSV Turret (VAN242) M113 FSV Turret (VAN242) M113 FSV Turret (VAN242)
Below: Adding the hatches to the top of the turret. Below: The fully assembled M113 FSV.
M113 FSV Turret (VAN242) M113 FSV Turret (VAN242) M113 FSV Turret (VAN242)
Adding A Vehicle Commander

Step 1.Attach the hatch in an open position.

Step 2. Add the vehicle commander into the open hatch. Below: The M113 FSV fully assembled complete with vehicle commander.
M113 FSV Turret (VAN242) M113 FSV Turret (VAN242) M113 FSV Turret (VAN242) M113 FSV Turret (VAN242)
Posted on

ASPB (Assault Support Patrol Boat) Assembly

ASPB (VUSBX15) Assembling the ASPB
Follow this guide to correctly assemble your ASPB. For metal and resin models like this one, we recommend you use cyanoacrylate ‘Super Glue’.GF9 Super Glue is available in the online store…
Contact the customer service team at [email protected] if you have any issues with any of the components.
The contents for the ASPB Box Set
Step 1. Begin assembly by glueing the guns to the turrets. Make sure they are facing the correct way. Step 2. Glue the gunner to the 81mm mortar.
ASPB (VUSBX15) ASPB (VUSBX15) ASPB (VUSBX15)
Below. Gunner glued correctly. Step 3. Glue the radar dome into the hole in front of the boat’s pilot house.
ASPB (VUSBX15) ASPB (VUSBX15) ASPB (VUSBX15)
Step 4. Add all the pieces you’ve just assembled into their respective places as seen below.
ASPB (VUSBX15)
And you’re done! Happy modelling.
Posted on

Assault Support Patrol Boat (VUSBX15) Spotlight


ASPB (Assault Support Patrol Boat) (VUSBX15) Includes one Assault Support Patrol Boat boat.

The Assault Support Patrol Boats (ASPB) were known as Alpha boats, owing to the A-designation on their hull numbers. They were the only boat in the MRF purpose built for the riverine mission.

Check out the Assault Support Patrol Boat in the online store here…

The Alpha boat entered service in September 1967 and became known as the Brown Water Navy’s “destroyer”. It was lighter and faster than the Monitor, the MRF’s “river battleship”, but it still packed quite a punch, with two .50-calibre heavy machine guns, 20mm cannon and multipurpose 81mm mortar for indirect fire. Each river division could rely on eight ASPBs to lead patrols upriver.

Designed by Evan Allen
Painted by Aaron Mathie

ASPB (Assault Support Patrol Boat) (VUSBX15)
The Assault Support Patrol Boat ASPB

Length:

50’ 1” (15m)
Beam: 15’ 2” (4.6m)
Draft: 3’ 6” (1m)
Displacement: 58,500lb (26.5 tonnes)
Speed: 16 knots (30km/h)
Crew: 6
The Assault Support Patrol Boat in ‘Nam
ASPB (Assault Support Patrol Boat) (VUSBX15)
ASPB (Assault Support Patrol Boat) (VUSBX15) ASPB (Assault Support Patrol Boat) (VUSBX15)
ASPB (Assault Support Patrol Boat) (VUSBX15)
Posted on

US Monitor Boat Assembly


Monitor (VUSBX13) Assembling the Monitor

Follow this guide to correctly assemble your Monitor. For metal and resin models like this one, we recommend you use cyanoacrylate ‘Super Glue’.GF9 Super Glue is available in the online store…
Contact the customer service team at [email protected] if you have any issues with any of the components.
The contents for the Monitor Box Set
Monitor (VUSBX13)
Step 1. Add the bow to the hull (you don’t have to use glue for this part). Step 2.Glue the pilot’s deck to the hull. Below. Hull assembled correctly.
Monitor (VUSBX13) Monitor (VUSBX13) Monitor (VUSBX13)
Step 3. Glue the guns into their turrets as shown below. (Make sure you don’t glue the 40mm gun into the 20mm gun turrets). Step 4. Glue the hatch cover to each of the the Zippo Flamethrowers.
Monitor (VUSBX13) Monitor (VUSBX13) Monitor (VUSBX13)
Step 5. Next place the Flamethrower onto the gun mount (Ensure you do not glue this part so you can rotate the guns in game.) Step 6. Glue the gunner to the 81mm mortar.
Monitor (VUSBX13) Monitor (VUSBX13) Monitor (VUSBX13)
For your 20mm turrets you have the option of choosing the M2 .50cal turret or the 40mm Grenade turret. The Monitor has three different variants. The CCB Monitor, Zippo Monitor and the Monitor with MK 2 81mm mortar. Look below to see the placement for each variant.
Monitor (VUSBX13) Monitor (VUSBX13)
Happy Modelling!
Monitor (VUSBX13)
Posted on

US Monitor Boat (VUSBX13) Spotlight


Monitor (VUSBX13) Includes one Monitor boat with optional zippo turrets and command tent .

The Monitor was based on the ATC, but the boat’s ramp was replaced with a blunt-shaped bow and the forecastle extended. Known as the MRF’s “battleship”, it could carry a large number of weapons. A river division had up to three available for operations to provide serious firepower to patrols.

Check out the Monitor in the online store here…

Monitors were heavily armored, and normally mounted the largest guns of all riverine warships. The name originated from the US Navy’s USS Monitor, which made her first appearance in the American Civil War, and being distinguished by the use of revolving gun turrets.

The Monitor could call on some formidable weaponry, including a powerful turret-mounted 40mm gun, three 20mm cannon, and a multipurpose 81mm mortar. And that’s not even mentioning the Zippo variant, with two fearsome flame-throwers.

Designed by Evan Allen
Painted by Aaron Mathie

Monitor (VUSBX13)
The Monitor Monitor

Length:

61’ (18.5m)
Beam: 17’ 6” (5.3m)
Draft: 3’ 6” (1m)
Displacement: 169,000lb (76 tonnes)
Speed: 8.5 knots (16km/h)
Crew: 11
The Monitor in ‘Nam

Monitor (VUSBX13)
Monitor (VUSBX13) Monitor (VUSBX13)
Monitor (VUSBX13)
Monitor (VUSBX13) Monitor (VUSBX13)
Posted on

PBR (Patrol Boat, River x2) Assembly


Step 1. Begin assembly of the Patrol Boat by gluing the radar dome into the hole in front of the boat’s pilot house.
PBR (Patrol Boat, Riverine x2) (VUSBX12) PBR (Patrol Boat, Riverine x2) (VUSBX12)
Tip: We recommend that you use good quality Super Glue to assemble resin and metal vehicles.
Step 2. Add the Twin M2 .50cal gun to the front deck turret. The front deck turret goes in the hole shown below. Do not glue it into place, so it can rotate to face toward its target.
PBR (Patrol Boat, Riverine x2) (VUSBX12) PBR (Patrol Boat, Riverine x2) (VUSBX12) PBR (Patrol Boat, Riverine x2) (VUSBX12)
Step 3. Next, add the upright armored shields in the slots located in the back of the boat. Make sure the rounded corners face upwards.
PBR (Patrol Boat, Riverine x2) (VUSBX12) PBR (Patrol Boat, Riverine x2) (VUSBX12)
Step 4. Begin assembly of the rear deck turret by adding the M2 .50cal to the gunner. Make sure the pin that holds the gun into place on the boat faces downwards.
PBR (Patrol Boat, Riverine x2) (VUSBX12) PBR (Patrol Boat, Riverine x2) (VUSBX12)
Step 5. Once the bond has cured, place the gunner into the notch that holds the gun as shown below.
PBR (Patrol Boat, Riverine x2) (VUSBX12) PBR (Patrol Boat, Riverine x2) (VUSBX12)

The fully assembled PBR

PBR (Patrol Boat, Riverine x2) (VUSBX12)
I hope you found this article helpful while assembling your PBR. Happy modelling!

~ George.

Posted on

Patrol Boat (VUSBX12) Spotlight


PBR (Patrol Boat, Riverine x2) (VUSBX12) The Patrol Boat, River or PBR, was a small rigid-hulled patrol boat that was the mainstay of Operation Game Warden. PBRs did not usually operate with the Mobile Riverine Force; their mission was to interdict illicit waterway traffic and provide intelligence to the navy. Occasionally, this mission would overlap with the Mobile Riverine Force’s mission and the two would cooperate.

Check out the Patrol Boat in the online store here…

The PBR was usually manned by a 4-man crew. Typically, a First Class Petty Officer served as boat captain, with a gunner’s mate, an engineman and a seaman on board. Each crewman was cross-trained in each other’s job in case one became unable to carry out his duties. Generally, PBRs operated in pairs under the command of a patrol officer, who rode on one of the boats.

Designed by Evan Allen
Painted by Aaron Mathie

PBR (Patrol Boat, Riverine x2) (VUSBX12)

The PBR (Patrol Boat, River) Mk II PBR

Length:

31’ 11” (9.8m)
Beam: 11’ 7” (3.5m)
Draft: 2’ (60cm)
Displacement: 16000lb (7.25tonnes)
Speed: 28 knots (52km/h)
Crew: 4

The PBR in ‘Nam

 
PBR (Patrol Boat, Riverine x2) (VUSBX12) PBR (Patrol Boat, Riverine x2) (VUSBX12)
With a shallow-draught fibreglass hull and water jet drive, the PBR could operate in the shallow, weed-choked rivers of the Mekong Delta. The dual 180hp pump-jet drives, which could be pivoted to reverse direction, made the boat extremely fast and nimble. PBRs did not have much in the way of armour protection – just some shielding for the .50-cal machine guns and upright steel armour plates in the midships. Instead, the boats were designed to rely on acceleration and maneuverability to get out of trouble.
PBR (Patrol Boat, Riverine x2) (VUSBX12) PBR (Patrol Boat, Riverine x2) (VUSBX12)

Contents of the PBR box

Contact the customer service team at [email protected] if you have any issues with any of the components.
PBR (Patrol Boat, Riverine x2) (VUSBX12)